
Friday, May 27, 2011
My Babies In The Spotlight
Zip and Milo's newborn picture was featured on the Seattle Times pet blog this morning. I'm over the moon and e-mailing everyone I know-They are picture 3 on tab 3 if you are up for some serious cuteness! Obviously they were selected because they are so adorable and it had nothing to do with their crazy-cat-lady-mother sending in their picture.

Zip has been fighting off a little kitty cold this week. He is so sad with his little sneezes. When I adopted them as kittens they came home with a little kennel cough of sorts. They were fighters and got right through it. I read online that you can help ease their congestion by putting them in a "steam room." Last night Zip got the royal treatment including his basket, and toys locked in the bathroom with a hot shower running. When I came in 5 minutes later he was so content- just hanging out in the sauna, watching the water hit the tub- happy kitty.
Wednesday, May 25, 2011
Pipe Down Resolved
Well our pipe situation has been resolved! In our first attempt at DIY-plumbing we were miraculously successful. We left off last week with Greg and I headed to home depot in search of a replacement sill cock.
Well home depot had quite the selection in the sill cock (I still can't say the name with out giggling) department, but as it turns out finding our 1/2" male adaptor was a bit more challenging. They only had the adaptor we needed in an 8" SC. So we decided we'd grab it as a back-up (we had no water!), but headed immediately over to McLendon'ser hardware.

We had heard from a few people to check out McLendon's and man were they right! For those of you out there that get excited by hardware stores (like me!)-- add McLendon's to your list. The woman who helped us was a real sill cock expert. She gave us the full run-down on our 6" model, including the fact that they had shortened the model in the last few years, so we would probably need an adaptor.
We were instantly sold on the McLendon's sillcock- it was an exact match to the burst pipe, made of copper (not brass like the HD models) and our favorite selling point MADE IN THE USA!! I should also mention it was $5 cheaper than HD- hello savings!
While we were out we ended up picking up a few other supplies to finish the job:

The one inch drill bit worked beautifully. The fence cap fit our SC like a glove.

Before attaching it to the pipe, we quickly added some insulating tape, as an additional layer of protection for this prone-pipe. We plan to put a heated wire around this piece and the connecting pipe section this fall to avoid any future freezing issues.

We screwed the new sill cock in nice and tight and were just about ready to call it a night... but wait.

Of all the things we had over-looked we forgot that the fence cap we had purchased as our upgrade was actually a 1/2" narrower than the old one. This meant we had a nice little gap between the wood and the faucet.
We discussed our options, and in the end we decided we would just use the old piece of wood. So we unscrewed, and rescrewed and voil-lay!

Greg went right to town with his caulking- sealing that baby right up.


The caulking says it can take a few days to dry completely. We left it overnight and then Greg did a few touch ups to make sure their weren't any gaps. This weekend we're going to do the final paint over with our little color-matched sample from HD.

Well home depot had quite the selection in the sill cock (I still can't say the name with out giggling) department, but as it turns out finding our 1/2" male adaptor was a bit more challenging. They only had the adaptor we needed in an 8" SC. So we decided we'd grab it as a back-up (we had no water!), but headed immediately over to McLendon'ser hardware.

We had heard from a few people to check out McLendon's and man were they right! For those of you out there that get excited by hardware stores (like me!)-- add McLendon's to your list. The woman who helped us was a real sill cock expert. She gave us the full run-down on our 6" model, including the fact that they had shortened the model in the last few years, so we would probably need an adaptor.
We were instantly sold on the McLendon's sillcock- it was an exact match to the burst pipe, made of copper (not brass like the HD models) and our favorite selling point MADE IN THE USA!! I should also mention it was $5 cheaper than HD- hello savings!
While we were out we ended up picking up a few other supplies to finish the job:
- Cedar fence cap
- Caulking
- Caulking gun
- Pipe insulating tape
- Drill bit
- A paint sample color matched to our house


We screwed the new sill cock in nice and tight and were just about ready to call it a night... but wait.

Of all the things we had over-looked we forgot that the fence cap we had purchased as our upgrade was actually a 1/2" narrower than the old one. This meant we had a nice little gap between the wood and the faucet.
We discussed our options, and in the end we decided we would just use the old piece of wood. So we unscrewed, and rescrewed and voil-lay!

Greg went right to town with his caulking- sealing that baby right up.


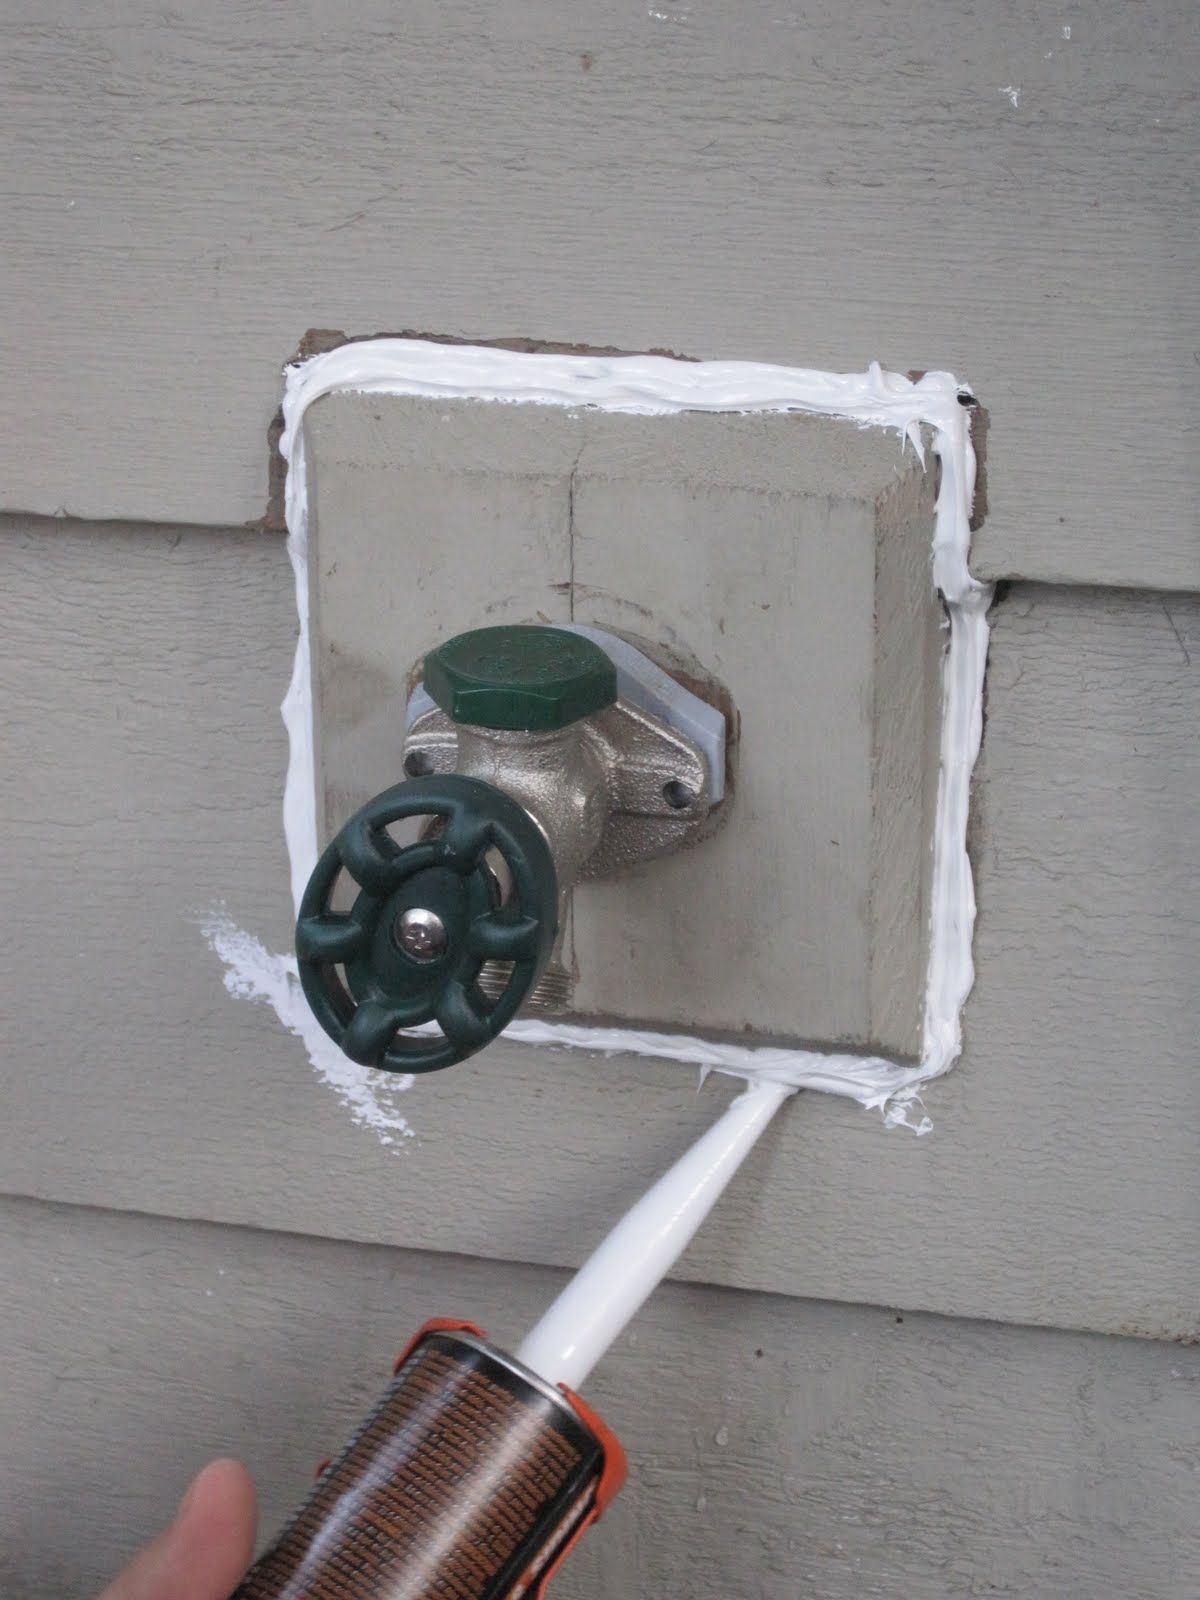
The caulking says it can take a few days to dry completely. We left it overnight and then Greg did a few touch ups to make sure their weren't any gaps. This weekend we're going to do the final paint over with our little color-matched sample from HD.

That pipe sure caused a few minutes of high blood pressure, but it turned out to be nothing we couldn't handle. Go team suburbanistas!
Tuesday, May 24, 2011
A Bed for Papa Bear- Ordered
Remember a few weeks back my big plans for a guest bedroom? Well with the parents arriving in two weeks from tomorrow, we have kicked things into high-gear around here.
We took a leap of faith and ordered the Sleep Innovations 10-inch Sure Temp Memory Foam Mattress (whew quite the mouthful!). The great price and positive reviews (for both the 10" and 12" models) were the key points in convincing the ever-weary husband of mine.
 With the free shipping, it probably won't be here for at least a week, but that gives us just enough time to finish up the bed (more on that in a minute) and hunt down a bargain box-spring.
Our amazon order today ran us a nice $406- not to bad for a queen!
$348- Mattress
$22- Mattress pad
$35- Tax (lets move to Oregon!)
We still have a few other things to check off before the big arrival. Here is what I am hoping for:

We took a leap of faith and ordered the Sleep Innovations 10-inch Sure Temp Memory Foam Mattress (whew quite the mouthful!). The great price and positive reviews (for both the 10" and 12" models) were the key points in convincing the ever-weary husband of mine.
Our amazon order today ran us a nice $406- not to bad for a queen!
$348- Mattress
$22- Mattress pad
$35- Tax (lets move to Oregon!)
We still have a few other things to check off before the big arrival. Here is what I am hoping for:
- A bed frame
- A boxspring
- New set of sheets
- Shams
- Bedside table
- Hang pictures on the walls (un-related to guest bedroom)

Friday, May 20, 2011
The Suburban Backyard Facelift: Getting Down to Business
After a few weekends of pulling roots and filling yard waste bins, we had pretty much cleared all that we could. We also had uncovered a few rotten stumps, lots of moss and ferns that were hidden under all the growth.
Next on the list was getting the required permits to take down the large trees closest to our house. Our inspector casually mentioned a city code which requires a permit to take down trees in our area... good thing or we would have been some doing some seriously un-permitted tree removal. Up there in Alaska where I come from what you do on your land is your business- speaking of Alaska did you see Sarah Palin's son got married- You Betcha! Down here in the suburbs its a different story. Although filling out the paper work is a bit of a pain, we do like that our community values trees- the trees and green are one of the things we love most about Seattle.
Over the next few weeks we read up on the code, researched our replacement tree options, and scheduled our "tree removal." Once everything was filled out, we headed down to city hall to get the permits. It was a relatively quick and easy process of proving home-ownership, showing the location of what trees, confirming we weren't in wetland area and finally issuing the sacred piece of paper.
Four days later, my brother-in-law rolled into town to do the deed. Now, let me be clear here, my BIL is a professional. Luckily for us, he's also family and so generously helped us out. Tom spent a few years taking trees down all over the Pacific Northwest before he and his wife decided to take over their family business.
Anyhow, Tom is as legit as they come. Chainsaws, ropes, harnesses, a beard and a flannel shirt. They (Tom, Greg and BIL Jon) started the job around 6pm and had the trees down and chopped by 8:30. I watched anxiously from inside. At one point I had to go into the garage because my stomach couldn't handle the intensity.
I wasn't quite prepared for the mess (branches, stumps, wood, saw dust) that was left after the trees were down, but the light and openness were just what we wanted.
8am the next morning, Greg and Tom started on the next step...digging out stumps. We decided against using a stump grinder, and instead rented a mini excavator from Eastside rentals (who are super friendly and accomodating-great experience renting from them). The boys spent most of the day playing in a grown-up sandbox. In addition to the major stumps left from the day before, there were a number of smaller stumps and the old ones that were hidden under all the salel. The mini-excavator was worth every penny.
Next on the list was getting the required permits to take down the large trees closest to our house. Our inspector casually mentioned a city code which requires a permit to take down trees in our area... good thing or we would have been some doing some seriously un-permitted tree removal. Up there in Alaska where I come from what you do on your land is your business- speaking of Alaska did you see Sarah Palin's son got married- You Betcha! Down here in the suburbs its a different story. Although filling out the paper work is a bit of a pain, we do like that our community values trees- the trees and green are one of the things we love most about Seattle.
Over the next few weeks we read up on the code, researched our replacement tree options, and scheduled our "tree removal." Once everything was filled out, we headed down to city hall to get the permits. It was a relatively quick and easy process of proving home-ownership, showing the location of what trees, confirming we weren't in wetland area and finally issuing the sacred piece of paper.
Four days later, my brother-in-law rolled into town to do the deed. Now, let me be clear here, my BIL is a professional. Luckily for us, he's also family and so generously helped us out. Tom spent a few years taking trees down all over the Pacific Northwest before he and his wife decided to take over their family business.
Anyhow, Tom is as legit as they come. Chainsaws, ropes, harnesses, a beard and a flannel shirt. They (Tom, Greg and BIL Jon) started the job around 6pm and had the trees down and chopped by 8:30. I watched anxiously from inside. At one point I had to go into the garage because my stomach couldn't handle the intensity.
 |
| Hello disaster |
8am the next morning, Greg and Tom started on the next step...digging out stumps. We decided against using a stump grinder, and instead rented a mini excavator from Eastside rentals (who are super friendly and accomodating-great experience renting from them). The boys spent most of the day playing in a grown-up sandbox. In addition to the major stumps left from the day before, there were a number of smaller stumps and the old ones that were hidden under all the salel. The mini-excavator was worth every penny.
 |
| In his Element |
While they were digging, I was hauling. Branches, wood, you name it. By the time the sunset on that Sunday I was covered in dirt and bruises and our backyard had craters like the moon. Luckily during one of my hauling, our friendly neighbor stopped by to ask if we were getting ready for our upcoming city recycling event. Ummm no? I promptly came inside and did some research. What were the chances that the following weekend we could recycle stumps and wood larger than 4" free of charge? SCORE!
Using the mini-excavator, Greg loaded the stumps (1,500 lbs +) into our truck bed where they sat for -the next week. We actually ended up taking three loads of stumps for a small donation to a local non-profit- the least we could do for such a bargain.
 |
| Rocking Out |
The mini-excavator really earned its keep in uncovering one big treasure. See that little rock in the bottom-right hand corner of this before picture. Well, when i couldn't move it, Greg offered to dig it out with the mini. Well, it took quite a bit of digging, and even more maneuvering to get that baby out of there. Turns out, we had our very own boulder nestled right into our little yard.
Given its history, we felt it needed to stay apart of our suburban backyard...just needed a little relocation. So with a few tipping scares, Greg and the mini moved that puppy back and center under our trees. We're still working on a name for him...
 |
| Where are we going with all of this... |
Next up was leveling, fertilizing, de-rocking and seeding... stay tuned.
Tuesday, May 17, 2011
The Suburban Backyard Facelift: Where it all Started
Let's start at the very beginning. When we were house hunting, our must haves were 3 bedrooms, 2 bathrooms, an attached garage, and a yard. We're outdoorsy people, we're (future) dog people, we're barbecue people, and we're planning to be baby people some day. Did you catch my drift... we're lawn people.
Our house had it all, except the perfect lawn. But with a big lot (for the Seattle area in our price range) at 10,000 square feet, we saw potential. Even before we'd put in an offer we talked about what we could do, where a dog house could go, where we'd get the best sun for a garden.
During our inspection, we learned about some major moss growth on the roof. I guess its pretty common around here due to all the moisture. But it can significantly reduce the life of your roof. We also had a serious water in the crawl-space issue going on. Bottom line: we had a lot of water going on.
So once the deal was done, we wasted no time getting to work. We closed on our house in January, we knew if we wanted grass by summer we had a tight timeline. We talked about holding off a year, but with trips, adventures, and life coming at us fast, we figured there's no time like the present.
Here is what we started with... about 12 feet of grass/moss/clover behind our house- then dense vegetation all the way to our property line.
One Saturday morning we made a trip down to our neighborhood Home Depot and ended up picking out some work gloves and yard tools (Being our first house we had nothing in the way of tools). I started working on the salal while Greg went to town limbing up trees. We used the basics: a bow rake, loppers, and a pruning saw.
It didn't take long to discover there was more than salal back there- much to our surprise we had our very own blackberry farm mixed into the thick of things. In true suburbanista fashion, I discovered the thorns, but it was actually our handy neighbor Steve who enlightened me on the joys of blackberry.
Sidenote: Our neighbor Steve is totally channeling Wilson from Tool Time- remember him?
So with many pricks, I proceeded to cut, pull, stack, stuff the assortment of things tangled together into our yard waste bin. It took a good few weeks of filling the bin and even getting a second bin (only $10 extra per month-so worth it) to make some progress on this mess. Once we had things above the surface under control, we put that rake to use going after the root systems.
While I was going to town on the "forest floor," Greg continued working away on our trees. We limbed everything up, and then Greg had some man-time taking down the sub 6" puppies closet to the house. You can see we left the stumps about 2 feet above ground... more on that down the road. Fire wood was saved, yard waste was packed, and our arms were exhausted.

To be continued...
Our house had it all, except the perfect lawn. But with a big lot (for the Seattle area in our price range) at 10,000 square feet, we saw potential. Even before we'd put in an offer we talked about what we could do, where a dog house could go, where we'd get the best sun for a garden.
During our inspection, we learned about some major moss growth on the roof. I guess its pretty common around here due to all the moisture. But it can significantly reduce the life of your roof. We also had a serious water in the crawl-space issue going on. Bottom line: we had a lot of water going on.
So once the deal was done, we wasted no time getting to work. We closed on our house in January, we knew if we wanted grass by summer we had a tight timeline. We talked about holding off a year, but with trips, adventures, and life coming at us fast, we figured there's no time like the present.
Here is what we started with... about 12 feet of grass/moss/clover behind our house- then dense vegetation all the way to our property line.
 |
| Looking Straight Out From the Patio |
 |
| Looking Left from the Patio |
It didn't take long to discover there was more than salal back there- much to our surprise we had our very own blackberry farm mixed into the thick of things. In true suburbanista fashion, I discovered the thorns, but it was actually our handy neighbor Steve who enlightened me on the joys of blackberry.
Sidenote: Our neighbor Steve is totally channeling Wilson from Tool Time- remember him?
So with many pricks, I proceeded to cut, pull, stack, stuff the assortment of things tangled together into our yard waste bin. It took a good few weeks of filling the bin and even getting a second bin (only $10 extra per month-so worth it) to make some progress on this mess. Once we had things above the surface under control, we put that rake to use going after the root systems.
 |
| Limbed up and cleared out |
While I was going to town on the "forest floor," Greg continued working away on our trees. We limbed everything up, and then Greg had some man-time taking down the sub 6" puppies closet to the house. You can see we left the stumps about 2 feet above ground... more on that down the road. Fire wood was saved, yard waste was packed, and our arms were exhausted.

To be continued...
Kitty Manicure: How to Trim Your Cat's Nails


We started trimming Zippy and Shishy's nails when they were kittens so it is now part of their weekly routine. They don't mind it, and I don't have to worry about scratched hands, ruined furniture or injured nieces and nephews.
Check out Shishy in picture 1- we call that his "Mother Hen" pose. Doesn't he look like he's sitting on his nest?
Monday, May 16, 2011
Pipe Down Over There
Oh the adventures in Home Ownership...
This adventure began on a random Monday night when I started telling Greg about the list of projects I had for my dad during his upcoming 36 hour visit.
Replace rusted outdoor light with motion-detector model
Spread mulch in front flower beds
Plant flowers in front flower beds
Fix leaky hose faucet
Figure out how to turn on over-head fluorescent lights in garage
Replace kitchen outlets with GFI outlets
On top of said list was to fix our leaky hose faucet. We had noticed the leak a few weeks prior, and via a through diagnosis with our resident plumber (a quick phone call with my dad) decided it was a join that needed to be tightened, re-saudered, taped, etc. (fill in any easy fix here).

So on this random Monday night, Greg and I decided why wait for my dad, when we DIY wanna-bes could implement the necessary fix and get back to using our hose.

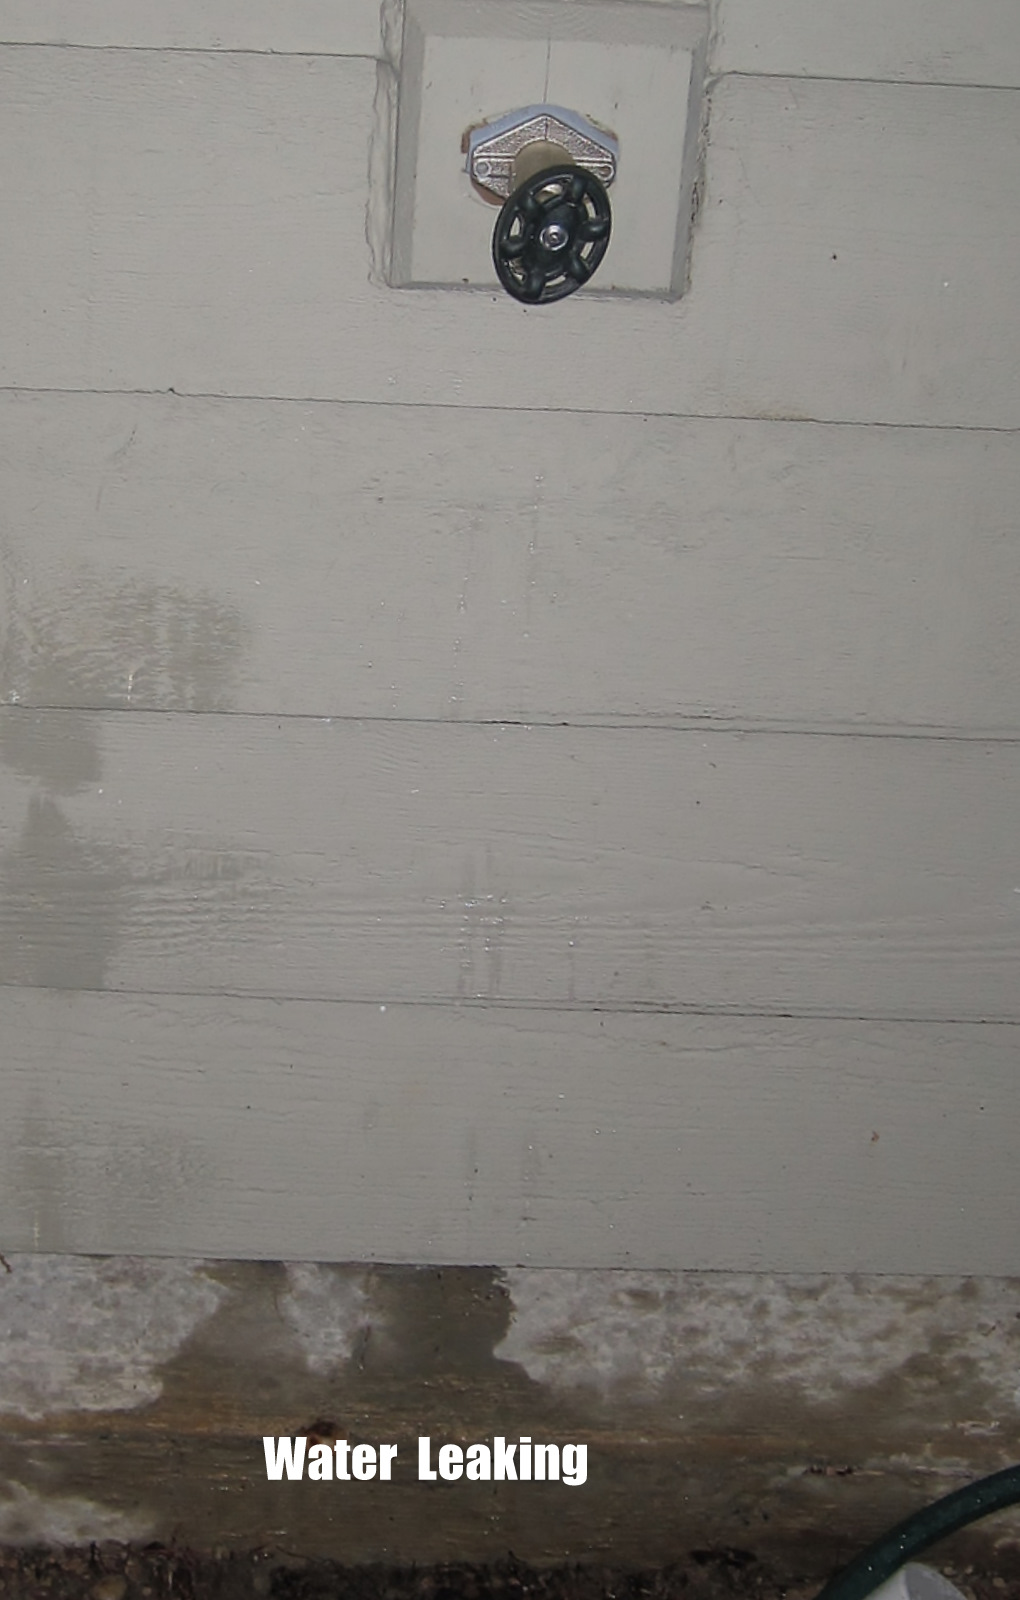
We started by peeling back the pipe insulation. Everything looked pretty normal. So I watched on the inside wall as Greg turned on the faucet. Expecting to see water leak from the joint nearest me, I stared as Greg said he was seeing the water outside. It took a few seconds for me to focus on the steady flow of water shooting from the middle of the pipe into our dry wall- not quite the easy fix we had expected.
We shut off the water and examined the culprit: a 2 cm bulging crack in our copper pipe.
Feeling quite proud in our DIY diagnosis, we proceeded to remove the burst pipe section with the intention of heading to our neighborhood Home Depot to get a replacement piece. Everything seemed to be going DIY-perfect up until this point, but that was about to change. Greg whipped out a pair of vice grips, and unscrewed the joint connected to the cracked sillcock. Boy was he met with quite the surprise: King Counties entire water supply geyser-ing into our garage.
Greg screamed, I screamed. We both looked at each other with wide eyes. What do we do? Call 911? Go ask our neighbor? Thankfully my level-headed husband instructed me to find the water shut off valve.
Lesson here: find out where your water shut-off is.
After two laps around the house in a soaking wet sweat shirt, with Greg plugging the pipe with his thumb, I was unable to find the coveted shut off. I returned to the garage with my fight-or-flight reflex in full gear. And as I approach Greg, I notice a red knob near the floor of the main pipe in our garage.
We briefly discussed our options and figured it must shut off the water to this section of the pipe which would stop our very own Western Washington Old Faithful.

Low and behold, 4 turns of the red knob and we are in business. Well, about 10 minutes of draining into a Tupperware later and we are in business. We had to get creative because of the location of the pipe... so we used a flexible cutting mat to re-direct water into the Tupperware.
Once things were relatively under control, we loaded up the Honda with our cracked pipe, wet sweat shirts and headed for Home Depot.
This adventure began on a random Monday night when I started telling Greg about the list of projects I had for my dad during his upcoming 36 hour visit.
Replace rusted outdoor light with motion-detector model
Spread mulch in front flower beds
Plant flowers in front flower beds
Fix leaky hose faucet
Figure out how to turn on over-head fluorescent lights in garage
Replace kitchen outlets with GFI outlets
On top of said list was to fix our leaky hose faucet. We had noticed the leak a few weeks prior, and via a through diagnosis with our resident plumber (a quick phone call with my dad) decided it was a join that needed to be tightened, re-saudered, taped, etc. (fill in any easy fix here).
So on this random Monday night, Greg and I decided why wait for my dad, when we DIY wanna-bes could implement the necessary fix and get back to using our hose.

We shut off the water and examined the culprit: a 2 cm bulging crack in our copper pipe.
 |
| Enter Exhibit A: The Aftermath of a Frozen Pipe |
Feeling quite proud in our DIY diagnosis, we proceeded to remove the burst pipe section with the intention of heading to our neighborhood Home Depot to get a replacement piece. Everything seemed to be going DIY-perfect up until this point, but that was about to change. Greg whipped out a pair of vice grips, and unscrewed the joint connected to the cracked sillcock. Boy was he met with quite the surprise: King Counties entire water supply geyser-ing into our garage.
Greg screamed, I screamed. We both looked at each other with wide eyes. What do we do? Call 911? Go ask our neighbor? Thankfully my level-headed husband instructed me to find the water shut off valve.
Lesson here: find out where your water shut-off is.
After two laps around the house in a soaking wet sweat shirt, with Greg plugging the pipe with his thumb, I was unable to find the coveted shut off. I returned to the garage with my fight-or-flight reflex in full gear. And as I approach Greg, I notice a red knob near the floor of the main pipe in our garage.
 |
We briefly discussed our options and figured it must shut off the water to this section of the pipe which would stop our very own Western Washington Old Faithful.

Low and behold, 4 turns of the red knob and we are in business. Well, about 10 minutes of draining into a Tupperware later and we are in business. We had to get creative because of the location of the pipe... so we used a flexible cutting mat to re-direct water into the Tupperware.
 |
Once things were relatively under control, we loaded up the Honda with our cracked pipe, wet sweat shirts and headed for Home Depot.
The Grass is Always Greener...
When we bought our house four months ago- the back yard looked like this:
Today it looks like this:
These are both taken from our patio (see the bush in the bottom left hand corner of both). Not exactly the same angle, but close.
It was quite an under-taking, but we're certain we saved a sweet penny by doing it ourselves. Tomorrow will start part one of our suburban backyard face-lift.
 |
| Greg checking out what we're up against |
 |
| Sunlight...finally |
These are both taken from our patio (see the bush in the bottom left hand corner of both). Not exactly the same angle, but close.
It was quite an under-taking, but we're certain we saved a sweet penny by doing it ourselves. Tomorrow will start part one of our suburban backyard face-lift.
Friday, May 13, 2011
The Godmother
This weekend, my sweet baby nephew is getting baptized and we've been asked to be his godparents. It is hard to put into words how honored we feel. We are so in love with sweet Levi and can't wait to help guide him through this life.

I realized this week I had a bit of a wardrobe dilemma. Plenty of winter sweaters and a few summer sun-dresses, but no spring church-appropriate combinations. For those of you in sunny parts of the world- soak it up and don't ever move to Seattle. Spring hasn't quite arrived, and we are greeted almost daily with rain,clouds, and vitamin D supplements.
I set out in search of a cute skirt this afternoon (in the pouring rain), but everything I tried on was to short or to work-ish. I soon realized I was going to need to go with plan B: find a cardigan that would pair with one of the jcrew sun-dresses I have to make a springy combo.
I landed on this sweater from Gap in a sand color. The sleeves and torso are long enough which is rare for me, I can wear it to work, and with a sale price of $24.99, I was sold.

So here are the options. Both of the dresses were from weddings last summer. Please excuse the wrinkles- clearly these puppies have been in the back of the closet.


I think I'm leaning towards the light blue on the right. I'm not big on color, so the pink seems like a bit too much of a statement. After all, the day is about sweet Levi, and my goal is just to blend nicely into the background and hold back my tears.

I realized this week I had a bit of a wardrobe dilemma. Plenty of winter sweaters and a few summer sun-dresses, but no spring church-appropriate combinations. For those of you in sunny parts of the world- soak it up and don't ever move to Seattle. Spring hasn't quite arrived, and we are greeted almost daily with rain,clouds, and vitamin D supplements.
I set out in search of a cute skirt this afternoon (in the pouring rain), but everything I tried on was to short or to work-ish. I soon realized I was going to need to go with plan B: find a cardigan that would pair with one of the jcrew sun-dresses I have to make a springy combo.
I landed on this sweater from Gap in a sand color. The sleeves and torso are long enough which is rare for me, I can wear it to work, and with a sale price of $24.99, I was sold.

So here are the options. Both of the dresses were from weddings last summer. Please excuse the wrinkles- clearly these puppies have been in the back of the closet.

I think I'm leaning towards the light blue on the right. I'm not big on color, so the pink seems like a bit too much of a statement. After all, the day is about sweet Levi, and my goal is just to blend nicely into the background and hold back my tears.
Wednesday, May 11, 2011
A Bed for Papa Bear
Nothing like an upcoming visit from my parents to get us in gear and figure out a guest bedroom situation. Greg conveniently uses one of our open rooms as his "guitar studio" so the missing bed and furniture are fine by him, but not by me. As for our other bedroom, in addition to missing furniture, its missing carpet and closet doors at the time being.

With a lot on the agenda this summer we've got a tight budget and timeline to get this guest bedroom in shape. I was scoping out bed options to see what it will run us and came across this 10 inch memory foam mattress at Amazon.
 It has great reviews, free shipping and at $345 for a queen the price is right. How funny is it that it comes squished into a little tiny box? I was originally looking at the 12 inch version--thicker is better right?-- wrong! Thanks to the reviews a number of people called out that not only is the 10 inch model cheaper, it also has an extra half inch of memory foam. We've never had a memory foam bed, but love our memory foam pillows from Costco. What do you think, anyone out there have a memory foam mattress?
My one concern is that it looks like you would either need a box spring or a platform bed, both of which would run that price tag right up. I've been watching Craigslist but haven't seen anything I'm crazy about, and I'm now at the point where getting a bed at Ikea doesn't do it for me.
Surfing around today I wound up looking over Ana White's bed making plans. Isn't this bed goregous? Very simple with classic lines. I can't take my mind off it!! The plans seem pretty simple, and I'm wondering if it a challenge the suburbanista can handle. I showed Greg and he of course said "no way." How's that for a challenge?

We don't have a kreg jig- I'm hoping its not a deal-breaker. I think we can work around that thought... just a bit more pre-drilling. I did a rough cost check with Greg and he thought we could get all the materials for $60-$70- not to bad for a fabulous queen sized bed.
Hmmmmm.....

With a lot on the agenda this summer we've got a tight budget and timeline to get this guest bedroom in shape. I was scoping out bed options to see what it will run us and came across this 10 inch memory foam mattress at Amazon.
My one concern is that it looks like you would either need a box spring or a platform bed, both of which would run that price tag right up. I've been watching Craigslist but haven't seen anything I'm crazy about, and I'm now at the point where getting a bed at Ikea doesn't do it for me.
Surfing around today I wound up looking over Ana White's bed making plans. Isn't this bed goregous? Very simple with classic lines. I can't take my mind off it!! The plans seem pretty simple, and I'm wondering if it a challenge the suburbanista can handle. I showed Greg and he of course said "no way." How's that for a challenge?

We don't have a kreg jig- I'm hoping its not a deal-breaker. I think we can work around that thought... just a bit more pre-drilling. I did a rough cost check with Greg and he thought we could get all the materials for $60-$70- not to bad for a fabulous queen sized bed.
Hmmmmm.....
Tuesday, May 10, 2011
DIY Floral Arranging
Have you ever arranged your own flowers? During my morning surf of the net I came across this article posted in the Home and Garden section of the Times.

I love fresh flowers, and I love a bargain so I guess its a given that I am all about diy floral arranging. I'm an amateur but got some serious practice during my wedding. I knew I wanted all white flowers for our big day, but had no idea how expensive florists were. On top of normal expenses, getting married in Port Ludlow added even more for delivery.
After doing some research, I decided I was going to do the flowers myself. I watched countless YouTube videos like this and this, researched floral arranging books on Amazon (then checked them out through the library), and bought a few bouquets of flowers at the grocery store to practice.


It actually wasn't that hard. Over the months leading up to my wedding I collected clippers, wire, tape and vases- mostly purchased at Ikea ($1.99 each), then the day before my bridesmaids and I spent a few hours putting everything together. Oh yes, we ordered most of the flowers from Costco for about $500-white roses, white hydrangeas, and calla lillies. We had them delivered right to Port Ludlow and then we picked up a few dozen Dahlia's at the Dahlia Barn in North Bend and drove them over.


All-in-all it took about 3 hours to put together 12 center pieces and 5 bouquets. I was really happy with how they turned out and the major cost savings. The bouquets are a little tricky until you get the hang of holding all the flowers in one hand. For the centerpieces, we used clear tape to make a grid on the top to hold the flowers in place. We were using clear glass vases so foam wasn't an option.


I'm going to host a baby-shower this summer... Do you have any cute and cheap diy centerpiece ideas?
Subscribe to:
Comments (Atom)